WELCOME!


It is hard to believe that it was only seven years ago I witnessed a CNC router in action for the very first time. I was fascinated and simply had to have one! Although I had been in the creative end of the three dimensional sign business for most of my life I didn't really know what I would do with one - but I just knew it could do fantastic stuff.

Through extensive research I quickly found out that with the relative simplicity of EnRoute, CNC routers were capable of just about anything imaginable. This journal will chronicle that journey to date and continue each week with two or three entries as we continue to explore just what is possible with this wonderful software... -dan

Wednesday, April 29, 2015

Runaway Train sign

The next project to be created is the Runaway Mine Train sign. The file wasn't difficult but it had a lot of pieces.


 The first step was to decide what would be on each layer. Much would be built as separate reliefs and then merged at the end.


I then made a vector around the outside. This would be a zero height relief to which everything would be merged.


Then I began modifying this relief by adding the letter borders starting with the lowest level.


Then it was the next border layer.


Then it was time to raise the letters.


Then it was time to build the curved beam and tracks. These reliefs were built separately. The beam and rail center were done at the same height.


The rail ties were next.


Then came the bottom flange of the rail.


The top rail was the last relief to be created.


Then it was a simple matter of merging (highest) everything to the background relief.


I tool pathed the file and then sent it off to the MultiCam. It was routed from a 1.25" thick piece of 30 lb Precision Board.


There's still the middle piece and the back files to create as well as the mining car. Those will be next. Stay tuned...

Tuesday, April 28, 2015

Wheels

I enjoy building complex files that take lots of individual steps to accomplish. I find them to be a real challenge and I LOVE a challenge!

Today's complex files are the wheels and tires for this jeep.


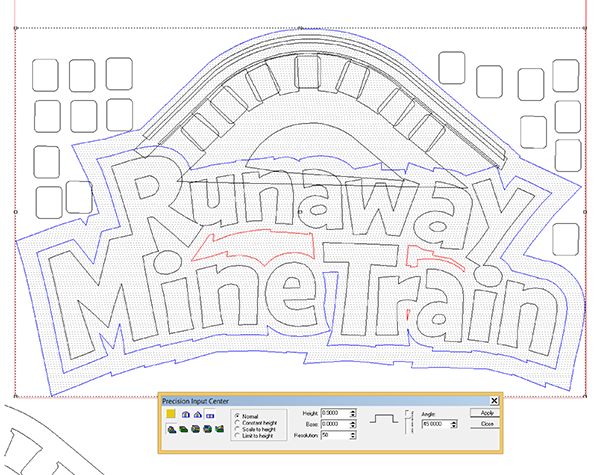
Save for the raised lettering I built the entire file inside EnRoute. The tires will be extreme lug mud tires and so I first created the chevrons that go around the outside of the tire. I only had to build one and EnRoute automatically does the rest. I used the outside edge of the tire to use as the guide. It is as simple as opening the menu and then typing in the values - in this case 15 lugs around the tire.


Than I added in the rest of the vectors I needed to build the wheels and tires.


Most of the elements were built as separate relief which I would combine at the last minute. The first relief was a zero height backdrop. Everything will eventually be adjusted height wise and then merged highest with this relief.


The lug around the edge were built as flat reliefs which were 0.9" tall. I used the dome tool to create the sidewalls of the tire.


I then modified the donut by adding the raised lettering.


I missed screen capturing the building of the rim... a simple flat relief. Once I had all of the reliefs built it was time to MERGE highest with the zero height relief.


The wheel and tire are to be routed in three layers, front back and center. The center is a simple offset cut save for the center which is machined to look like a rim. I used the dome tool to build a dish.


Then the slots in the wheel were created by making them zero height reliefs.


I them merged LOWEST these zero height slots to the dished rim.


The three pieces were then set up for routing from 30 lb Precision Board.


With that the file was ready to toolpath and and send off to the MultiCam.

Saturday, April 25, 2015

EnRoute Workshops

  • At the ISA show in Las Vegas I talked to hundreds of sign makers about the EnRoute Workshops which are offered around North America. I'll be attending and presenting at the three day Denver Workshop in mid-September. It promises to be a great workshop. We'll be covering much more than the standard workshops. More than a dozen people signed up at the MultiCam booth when I was there. If you are interested in attending this workshop don't wait too long. It's going to fill. The information and links are below...
    • At the ISA show in Las Vegas I talked to hundreds of sign makers about the EnRoute Workshops which are offered around North America. I'll be attending and presenting at the three day Denver Workshop in mid-September. It promises to be a great workshop. We'll be covering much more than the standard workshops. More than a dozen people signed up at the MultiCam booth when I was there. If you are interested in attending this workshop don't wait too long. It's going to fill. The information and links are below...

      CNC Workshops | CNC Training Workshops
      EnRoute 5 Workshop
       

      The 2015Workshop Series

      Learn New Techniques with EnRoute

      EnRoute Workshop Schedule for 2015

      • Toronto, Canada, June 3-4 @ Multicam Technology Center
      • Denver, CO VIP event Sept 16-18*
      • Hackensack NJ, October 8-9 @ Multicam Technology Center
      • Anaheim, CA, December 3-4 @ Multicam Technology Center

      *Meet the EnRoute developers at this special 3 Day "EnRoute Pro" event in Denver, CO. This will be a more advanced, three day class focused on 3D surfacing, carving and texture creation specifically for the sign and woodworking industries. Dan Sawatzky will also be in attendance and showing his magic.
       
       “The EnRoute workshop was worth every cent. The instructors patiently relayed, in detail, every aspect of EnRoute’s 2.5D, 3D, Rapid Texture techniques and the many other functions of Enroute. I am now able to take advantage of the tremendous features provided in the software. Thanks Enroute!”
      - Henry from H & S Marine Plastics, New York/New Jersey Workshop Attendee

       RSVP 

      Early Bird Discount Space is limited, so register early to guarantee your seat. It's $995 to attend a 2-day class or $1,295 to attend the EnRoute Pro 3-day class, but you save $200 when you register 30 days before the event. Attendees from 2014 save $300 when you register 30 days before the class.
      To register, contact Terri Wright
      1800.229.9066 x114 or EnRouteSales@ThinkSAi.com

      Details

      Bring your own computer and follow along on your PC with a demo version of EnRoute we’ll provide. No key required. Here is the 2-day class schedule:
      Day 1, 8:30am - 5pm
      Morning – It Never Hurts to Know the Basics
      • EnRoute Concepts Review
      • Toolpath Basics
      • Nesting
      • Output & Ordering
      Afternoon – Advanced Toolpathing / Cutting
      • Inlays
      • 2-1/2 D
      • Rough, Fine & Clean Tools
      • Advanced Entry/Exit
      • 
      Day 1 Wrap-up and prepare for Day 2
      Day 2, 8:30am - 5pm
      Morning – Now for some Fun Surfaces
      • 3D Surface Concepts
      • Building a Relief
      • Parametric Textures

      Afternoon – EnRoute Rapid Texture
      • Seed Contour, Objects as Seed Contours & 3D Reliefs with Rapid Texture
      • Rapid Picture (Photo Cutting)
      • Noise and Distortion
      • Day 2 Wrap-up and Q & A
      EnRoute Classroom

Tuesday, April 21, 2015

More drawing the old fashioned way

I thought I might show another project's development in sketches. These were done in my sketchbook on a plane ride as I traveled home on a business trip. The drawings were quick and I filled there pages of my sketchbook in about half an hour or less. You can see the drawings were far from perfect. The client would never see them as they were just to guide our building of the feature. The first drawing was a quick sketch of the robot router. The ideas were pretty well formed at this point.


The next sketch was the top and side views. At this point I wanted to work out the scale of the piece and positioning of the gantry.  We ended up going a little wider as we built it but the bulk of the measurements went ahead as planned.


The last sketch in this series was for the metal framework. From this quick drawing I was able to work out a material list. Take note of the simplicity of the sketch and lack of angles or exact measurements. We build by eye for the most part and the drawings I do are simply a guide. Just the same they are a valuable tool to work things out, thereby enabling a quicker build of the finished feature.

Sunday, April 19, 2015

Exploring ideas with a pen and paper

One of the keys to coming up with a great and original designs is to learn to draw. While many may say they simply can't draw I believe it is a skill we can develop to a great degree. The key is to practice, practice practice. I buy inexpensive blank hard bound books (Staples) and fill them with ideas. I keep them handy and stashed wherever I might need one. Rather than work on loose paper I prefer to keep a record of my drawings for later reference. There's one by my bedside, one in the truck, in my briefcase and another by my recliner. More reside on my desk and all handy for when inspiration strikes or when I need to work out an idea.  I've filled more than fifty with another ten on the way to being filled.


So many designers go straight to the computer when they design. Rather than work out the rough or basic ideas they go straight to the details and in the process are limited. Let's look at a project I designed a while back to show my process of design. 

My client wanted a sign/entrance to a large development that was by the ocean. The proposed name was 'Lighthouse Village'. I opened one of my sketchbooks and began work. I wasn't concerned about fonts, nor colors. We were only exploring ideas in the broadest sense. I started with some sign ideas.


By the second page I was refining things a little 


Then I used that same idea in a different shape


Once I was a little satisfied it was time to veer off to explore some new ideas. This was a little simpler, perhaps a little more modern. 


This idea morphed into the beginnings of a monument sign. It had some potential.


Before I went further I decided to explore what the welcome/information center might look like. I explored these ideas for some time before deciding they were far too predictable and common. In my next meeting with the client I showed them these sketches but also some new ideas which were much more fun and interesting.


 So where did we end up when the drawing was done?
  

Wednesday, April 15, 2015

oops! I make mistakes too.

The artwork for the Blasting Barrels sign was done months ago. A second sign which is mounted to the ride was to be built by the ride manufacturer in Italy and the owner ordered that sign spelled with a dropped 'g'. I got the memo to change ours to suit but promptly forgot.


When it came time to create the file to route the sign I looked at my original artwork and then set to work. The framework was welded and the sign routed, glued and mounted before the mistake was caught. The owner told me to just grind off the 'g' but I couldn't do it.


Instead I built a new file and redid the sign. This is much too cool a project to compromise on quality. Yesterday we mounted the new sign and finished the sculpted concrete. I'm in the process of sculpting three stacked sticks of dynamite for the top of the sign and then it will head into the paint department.

Thursday, April 9, 2015

International Sign Association Show

Today was the first day of the International Sign Association convention/show in Las Vegas. The display we created for MultiCam arrived safe and sound and their people had everything perfectly set up for me. It was with great pleasure I was privileged to show and talk about how we use EnRoute in conjunction with our MultiCam machine to do our dimensional work using Precision Board. It was with great delight I talked to hundreds of wonderful people, greeting old friends and new.

If you are at the show in the next few days please drop by - MultiCam, booth 712!