WELCOME!


It is hard to believe that it was only seven years ago I witnessed a CNC router in action for the very first time. I was fascinated and simply had to have one! Although I had been in the creative end of the three dimensional sign business for most of my life I didn't really know what I would do with one - but I just knew it could do fantastic stuff.

Through extensive research I quickly found out that with the relative simplicity of EnRoute, CNC routers were capable of just about anything imaginable. This journal will chronicle that journey to date and continue each week with two or three entries as we continue to explore just what is possible with this wonderful software... -dan

Tuesday, March 29, 2016

Weapons to fight for

The crew have been busy painting the first of the features for the Motiongate project in Dubai. As always it starts with a minimum of three base coats of color. The last base coat was blended down from light to dark to give the features some weight. Instead of going straight to the colours we kept to the wood colours. A first light glaze was painted on and wiped off judiciously. Then we went back in with some dry brush for the paint colours on the box. It created an instant old look.


The colours were added to each piece. The key is to keep things complimentary so the individual pieces didn't compete with each other.


Then all the colours were on the boxes and barrels it was time for some details to make things special. In the How to Train Your Dragon Movie (which the features are based on) the dragon journal is written in a unique cryptic alphabet. With a little web research we could add the lettering to the box. It translates to read HAGGIS.


The boxes were polished off yesterday. Today it was time to put the finishing touches to the swords and axes. The crew worked their magic with the glazes and a little silver dry brush.


Tomorrow, the final coats of dull clear will go on to take away the shine of the semigloss paint we use and to also make the pieces more durable for the waterpark environment they are going to.

Sunday, March 20, 2016

Atlanta EnRoute Workshop


Home  |  Applications  |   Contact
“The EnRoute workshop was worth every cent. The instructors patiently relayed, in detail, every aspect of EnRoute’s 2.5D, 3D, Rapid Texture techniques and the many other functions of Enroute. I am now able to take advantage of the tremendous features provided in the software. Thanks!”
- Henry from H & S Marine Plastics
New York/New Jersey Workshop Attendee
Learn New Techniques
From rapid texture to advanced toolpathing our workshop will provide you with a variety of new techniques for you to get the most out of EnRoute software.
Learn More
Atlanta Workshop Location
3123 Humphries Hill Rd.
Austell, GA 30106
Workshop Agenda
Our Atlanta Workshop will be a 3-day event packed with useful information to help you enhance your skills using our software.
Click Here for Workshop Agenda

Pricing Information
Space is limited, so register early to guarantee your seat!
It's $1,295 to attend the EnRoute Atlanta 3-day workshop, but you save $200 when you register by March 15th. Attendees from 2015 save $300 when you register by March 15.

To register, contact Luke Benik at:

Saturday, March 19, 2016

Painting magic

It's fun to design dimensional signs in EnRoute and pure magic to watch the MultiCam carve the sign unaided from Precision Board. The result looks pretty good. But that is really only half the way there.

The real magic is in the painting process. The first step is to introduce some mild texture where it's smooth. This subtle texture is created by brushing on some heavy bodies primer. The best I've ever found is Coastal Enterprise's FSC 88 - WB (the WB stands for water based. It comes out of the can the thickness of cream. It dries quickly and if you use a small brush and leave the brush marks in on purpose it dries with that same look.

Then come three coats of acrylic paint. We use a top quality house paint... or in the case of this plaque  a gold metallic made by Modern Masters. Three coats are important if you want the piece to last.


Then comes a series of glazes. We always work from light to dark.

For them to work properly you need texture and the more the better. We load on the glaze and then wipe it off before it dries. The glaze stays in the lower areas and wipes off the raised areas. For wiping we use soft terry towel material. It's the best and we go through pickup loads of rags each year. (We buy used towels at the thrift store.)

The first glaze on the Daniel plaque was made by mixing some gold with a teeny bit of metallic cherry and mixing this paint with an equal amount of clear. For the clear we use untainted deep base paint of the same brand. To make the custom mix deeper colours the paint stores start with a clear base. It looks milky in the can but dries clear. The paint store folks will look at you weird but this is what we buy to make our glazes.


The next glaze was made from black cherry. Like the previous glaze it was slopped on with a big brush and then wiped off with a towel. If you look close you can see a little more dark glaze was left in the middle of the panel to make the letters pop.


The panel was allowed to dry overnight and then some metallic gold was brushed onto the letters. When this was dry a little darker color was gingerly dry brushed onto the bottom of the letters to give them a little extra depth.

Monday, March 14, 2016

Five more and the painting begins

The name plaques are all making their way through the painting process now. Craig's is the last one raw off the router. Because we use 30 lb Precision Board priming isn't necessary.


Over the next while I'll be posting some progress shots of how the name plaques come alive through the painting steps. Even though pricing is not necessary we still do it to ad some subtle texture. The secret of course is to use Coastal Enterprises thick bodied FSC-88 WB primer. WB stands for water base. We brush it on. Generally we have two gallons of primer on the go. As we work our way down into the first gallon it tends to get real thick - like sour cream. This is perfect for adding texture with a brush. The second gallon is a fresh one, which brushes out nice and smooth when we need it.


Those small bumps and ridges on the edges of your CNC cuts are easily smoothed out with the primer. They recommend (and we do too) that we put the pieces under a fan for a couple of hours to drive out the moisture.


Then when the primer has cured it is time for the base colours. We always triple coat and use a top quality acrylic house paint. We allow it to dry between coats, most often with a fan blowing on the piece.


Stay tuned for more progress shots as the glazes go on.

Sunday, March 13, 2016

Four more name plaques

With the first Sculpting Magic Workshop now only four and a half weeks away we are in full get ready mode. Most of the name plaques are routed and sample boards are almost done. About one third of the name plaques are making their way through the painting department with more to follow soon.

I thought a picture update of a few more of the plaques would be of interest. It is fun to come up with endless new ideas.


Saturday, March 12, 2016

Instant age

The rules of the Sign Challenge competition require that our pieces be shipped in a two foot by two foot box and then be pulled out and displayed on top. Rather than drape the box I decided to make it a part of the display. To maximize the size of the centre piece it meant the walls of the box needed to be as thin as possible. Steel construction was the obvious answer and with our MultiCam CNC plasma  handy the job was easy.

The files for the box were designed using EnRoute. The stars were drawn using the star creator. Nothing could be easier. I decided to use quarter sections of pipe for the corners with the radius to the inside.  The cutting of the steel plate took less than a half an hour. To weld all of the pieces together and grind it all smooth took about sixteen hours. It looked great already but the magic was yet to come.


Once the box was finished I carefully brushed on four coats of bright yellow paint. I let it cure and then broke out my orbital sander and proceeded to destroy the fancy paint and expose bare metal. I scratched things up randomly and even banged it around with my hammer. I wanted to add the look of age and hard use to match the tank displayed above it. I then judiciously applied the same 'swamp' glaze to create some appropriate grunge.As I added the antique look I imagined the kinds of knocks it might get in daily use.


Thursday, March 10, 2016

The magic is in the paint

No matter how one's dimensional work is done, whether by using software and a router or if it is done by hand the real magic happens with the paint. The current Sign Challenge piece is a good example.

The routed tracks and hand sculpted vehicle body and character look great un painted. Even so the painting process was where the piece came alive. As I painted I thought of the story I wanted to tell, then set to work.

The tank is well used and dirty from miles on the road and in outback conditions. The driver is intent on going wherever he wants and so the tank has definite wear and bumps and scrapes. He's also not much for maintenance and so the tank engine is grimy and dirty. The commander of the vehicle is persnickety about his own image and so the brass on his uniform is well polished.

The paint was put on in multiple coats, starting with the yellow, then the silver (bare metal) followed by two colours of rust. Then I applied a glaze we call SWAMP over the whole piece to dirty things up. Judicious removal of the glaze with a soft terry towel rag created the magic of age and grime.

Tomorrow the painting will be complete and the box/base finished as well. With the full reveal the theme/story of the piece will become evident. The clue is in the licence late. Stay tuned...


Wednesday, March 9, 2016

Fun details bottom to top!

I'm having a blast sculpting the details on the Sign Challenge piece. It's a chance to go wild with rivets and have some creative fun. 


There's detail at every level of this little piece. The engine is a four cylinder Hemi and was a great deal of fun to do. The wiring and plumbing will take it over the top. The painting process is going to be a great deal of fun too and will add a lot of character to the piece.


The turret of the tank was as much fun as the rest. It won't be long until we are into paint!


Tuesday, March 8, 2016

Mud magic

The Viking ship project for Motiongate in Dubai continues. The galvanized frames were wired using galvanized lath and special order galvanized tie wire.  Then we could begin the sculpting process. Some of the smaller pieces were done using sculpting epoxy. The barrels, boxes and helmets were done using our tried and true giber glass reinforced concrete. The pieces will be allowed to cure and then we'll begin the painting process,.


Sunday, March 6, 2016

On track...

My grand daughter Phoebe and I managed a little sculpting time this weekend. We finished the base of the sculpture and mounted the tracks. We even got a good start on the lower portion of the vehicle. I'm happy so far.

I've designed the box and stand as well as the upper portions of the imaginative vehicle. There will be plenty of eye candy to look at - just for fun! Stay tuned for more in the next day or two...

Saturday, March 5, 2016

Sign Challenge SURPRISE

There's only seven weeks to go before the 2016 Sign Challenge in Orlando at the International Sign Association Expo. I'll bet there are a bunch of sign makers now scrambling to finish designing and building their entries. Peter and I were a little smug in the knowledge that we had our entries ready to go for some time now. 

Then I talked to our friends at Coastal Enterprises. I promised a piece for their display at the show. As I thought about what to create a fabulous idea popped into my head. It wasn't suitable for their display but it was an awesome idea for the Sign Challenge. I decided I would give them the piece I had made previously. It was made largely using their product and it would be a good tie in to the Sign Challenge. 

That meant I had to get busy on the new piece for we will be shipping them out in the next ten days. Why is this new idea???   Stay tuned to the blog over the next week and it will be revealed....


I started with a vector drawing - all done in EnRoute. It is a heavy machine track. The build looks complex but in reality is a simple matter of creating individual reliefs of different heights and then combining them at the end.


The track cleats were first. I made the flat reliefs 1.5" tall.


Then the joining bracket relief was created as a flat relief at 0.7" tall.


The joining brackets were then modified using the dome tool to add the rivets.


I forgot to grab a screen capture but the next step was to create a slightly lower relief of the heavy connecting piece which went around under the tracks. I then merged the pieces together.


I then built the gears and various other pieces in the same fashion, modifying the base reliefs to add details. When all of the pieces were done I creates a larger zero height relief and MERGED HIGHEST all of the pieces to it.


I then created a copy of the finished relief and flipped it. The one on the left is the inside of the track. It has a 1.5" rectangular relief merged highest into the centre. This will be used to mount the track to the centre portion of the vehicle.


To provide a better picture of what the finished tracks would look like I sliced off the background.


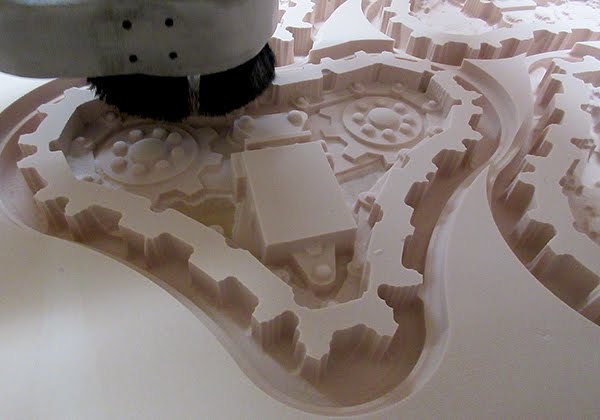
I then tool pathed the relief and sent it off to the MultiCam. Two copies of each piece were routed from 30 lb Precision Board.


This morning I glued and clamped the pieces to form two vehicle tracks. I used Coastal Enterprises PB Bond 240 glue.


Now the fun begins! Stay tuned....