WELCOME!


It is hard to believe that it was only seven years ago I witnessed a CNC router in action for the very first time. I was fascinated and simply had to have one! Although I had been in the creative end of the three dimensional sign business for most of my life I didn't really know what I would do with one - but I just knew it could do fantastic stuff.

Through extensive research I quickly found out that with the relative simplicity of EnRoute, CNC routers were capable of just about anything imaginable. This journal will chronicle that journey to date and continue each week with two or three entries as we continue to explore just what is possible with this wonderful software... -dan

Sunday, September 29, 2013

Better late than never


This is about the longest I've ever sat on a design for a sign but after twelve years it is finally time to build it. Back when I designed it I had no MultiCam CNC router and no fancy programs. I didn't use Precision Board back then either. Back then, if the sign had been made it would have all been done by hand. Now it is a whole lot easier.

Here's the original design, only tweaked a little of late.


I traced the vectors in PhotoShop and then saved them as AI files. I still have to do the lettering before I bring the vectors into EnRoute and then the fun begins. The sign will be double sided and will be routed in seven layers from 1.5" thick Precision Board. Much of the beaver's detail will be sculpted by hand using Abracadabra Sculpt epoxy. It's going to be a beefy sign measuring about four feet tall (maybe a little more) and ten inches thick.


Stay tuned for the fun.

-dan

Thursday, September 26, 2013

Carving a gnarly tree


Work continues at a busy pace in our shop. It's my job to design and weld the structure for each piece. The fellows doing the lathing (tying on the galvanized diamond lath) are only a day or two behind and catching up fast. When the lathing is done we lather on a thick coat of fiberglass-reinforced-concrete and then wait just the right amount of time for the mud to set up and then carve like crazy. There is no stopping until the carving and cleanup is done. The key is to carve at the same speed as the mud went on for then it stays perfect. I carved this tree while TJ carved another piece. He also gave me a hand smoothing out the rocks.


Next I'll add the edge and end grain to the sign wood using an air powered die grinder. I'll also sculpt a cartoon bird which will be perched on the top and is to be fastened on the steel rod that sticks out of the top of the sign.


It was great fun to sculpt the gnarly detail into the twisted tree! 


Stay tuned as it all comes together in the next few days...

-dan

Saturday, September 21, 2013

First sign for Cultus Lake Adventure Park


Work has begun in earnest on the Cultus Lake Adventure Park project. One of the areas is a kids play area called Wilderness Trails. One of five projects started was this sign. 

To create the name I first drew it quickly in my sketchbook. Because the park is aimed at young kids I used upper and lower case letters and made it as readable as possible.  I then hand vectorized the drawing in a few minutes. 


I then imported the vectors into EnRoute and began building the sign file.


The first task was to create the lettering outline using the offset drawing tool.


I then imported the driftwood bitmap from the TEXTURE MAGIC COLLECTION. I used the vector drawing tool to draw the outline of the sign using the bitmap as a guide.


I then created a flat relief.


Then I applied the bitmap. Because this is a relatively large sign and I wanted a deep woodgrain I used a value of 0.3"


I then selected the lettering outline and made another flat relief. I entered the front view and nudged it into position vertically.


The lettering outline was then MERGED HIGHEST with the background relief.


The last step was to create the lettering by modifying the background relief. I used the dome tool with the base of the lettering being 0.2" high.  I used constant height to keep the letters the same height.


I had copied the file prior to merging it with the lettering outline this was flipped to create the back of the sign. I created a second copy and then deleted the relief to go back to the vector. I added two more vector shapes to create a void in the sign middle section to allow for the structural framework.


I used the combine tool to create the final vectors.


I drilled a hole in the sign center from the top and then placed the piece over the framework. I inserted a steel rod and welded it to the tubing using the void for access.


The back and front of the sign were then glued to the middle encasing the structural steel inside. The steel rod was protruding out of the top and the bird will be fastened to this for strength.


The steel framework will now be skinned with galvanized lath and then we'll sculpt the fiberglass reinforced concrete. It is going to be a cool sign! Stay tuned...

-dan

Friday, September 20, 2013

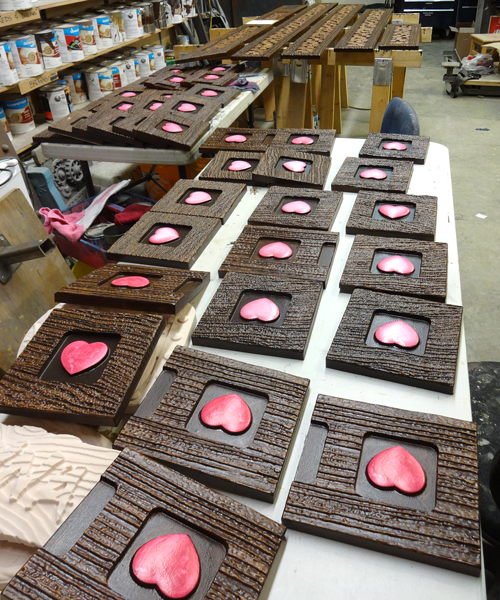
HEARTS! Everywhere.


We are wrapping up the routing on the house project for the season as we move on to begin the major customer project that will take us into NEXT summer. The crew is split right now with half finishing up the work on the house and the other half busy on the new. My job is to juggle and organize everyone, plus the final planning for the big project plus the preliminary planning for the next after that. I'm also trying to squeeze in as much physical work as I can as well.

Half the shop is stacked with almost completed trim in the final stages of paint. Most are the square trim blocks that will go on the intersections of all of the house trip. It is a colorful sight! Next week they will all be out of the shop and onto the house at last!


The house is now looking spectacular with the bulk of the trim in place. It is hard to believe how many pieces were designed in EnRoute, and routed with the MultiCam from 30 lb Precision Board. The project would have been almost impossible any other way. I'll be posting pictures soon of the house with the trim all in place.

-dan

Monday, September 16, 2013

Retro Eveline


I've always loved the retro, streamlined, modern scripts on old cars and fridges which inspired my choice of lettering for Eveline's name plaque. I decided it needed to be in a simple oval with a textured background. The vectors were created in EnRoute. a little kerning was necessary. I first created a flat relief.


The next step was to modify the flat oval relief by raising the center portion using the dome tool.


Then I added a texture called chicken scratch with a value of 0.15"


I then used the splotches bitmap to add a gentle overall texture to the inside oval.


I then created a flat relief using the lettering outline. It was 0.45" tall.


I then modified this flat relief using the dome tool and the inside oval vector. I used the same values for the doming so the curve matched the base oval.


I then nudged the lettering outline vertically into position in the front view.


This was then merged highest with the base relief.


Lastly I added the lettering using the dome tool. The lettering had a vertical base of 0.15"


The piece was tool pathed using a 3/8" ball nose bit and a 50% overlap for the rough and a 1/8" ball nose bit and an 80% overlap for the final. As usual it was machined on the MultiCam from 1.5" thick 30 lb Precision Board.


I look forward to seeing how Becke is going to paint this piece up.

-dan

Sunday, September 15, 2013

Philip - number one


Philip's name tag was back to basics, a relatively simple 3D build. I started with the vectors - all built in EnRoute and used the offset drawing tool to create the plaque edge and letter borders. The plaque shape is a combination of a rectangle and circle shapes.

Once I had the vectors nailed I stated with a simple flat relief that was 0.65" tall.


Then I dropped the center portions of the plaque by 0.35" . It is deep enough to allow two layers of texture bitmaps. which is the next step.


The first bitmap is called frantic stars (from the TEXTURE MAGIC COLLECTION) I applied it with a value of 0.15" which means the white was raised by 0.15" The black areas didn't do anything remained flat.


Then I imported the splotches bitmap into EnRoute and applied it at 0.1".


The lettering border was created as a separate flat relief at 0.65" tall.


The decorative round bits were the next reliefs to be crated using the bevel tool. I looked at the front view to make sure they were in position vertically.


The round cones and the lettering background were was then merges highest with the background.


 THe last step before tool pathing was to create the prismatic lettering using the bevel relief tool.

I used a 3/8" ball nose bit to rough it out (50% overlap) and a 1/8" ball nose bit with an 80% overlap for the final pass. I used an island fill. The piece was routed from 1.5" thick sheet of 30 lb Precision Board.


Stay tuned for more...

-dan

Wednesday, September 11, 2013

Guy's name tag


For Guy's name plaque I decided a log round would be cool. I started with a domed round relief then imported the bitmap (from the TEXTURE MAGIC COLLECTION)


I created the first vector and relief round because the bitmap was that shape, but I squished it a bit to make it an oval. I then created a 1/2" tall flat relief using the lettering outline.


Then using the oval vector (offset from the primary relief) I modified the lettering outline relief using the dome tool.


Then I modified the oval base relief  using the lettering vectors. This effectively pushed the letters (with the wood grain) up through the smooth lettering outline.


The last step was to merge (highest) the two reliefs.


As always the file was now ready for tool pathing and then to be sent to the MultiCam to be routed from 1.5" 30 lb Precision Board.


It will look even better with paint and glazes. Stay tuned...

-dan